You grab a roll of canvas for pennies compared to pre-stretched prices. Then you realize it needs stretching. Don’t worry. You can do this at home and save 50 to 70 percent on supplies.
Stretching your own canvas fits any painting size perfectly. Plus, it’s satisfying work that gives you control. You’ll use basic stretcher bars and pliers for a tight, pro result.
This guide walks you through every step. Beginners get clear tips and warnings. Follow along, and you’ll have a ready-to-paint surface in under an hour.
Round Up These Simple Supplies to Get Started
Gather your tools first. This keeps the process smooth. Most items cost little, and you’ll reuse them often.
You’ll need four stretcher bars. Pick ones that match your size, like 16 by 20 inches. They come mitred for easy joints.
Get a canvas sheet or roll. Add four to six inches extra per side for pulling.
A heavy-duty staple gun with 3/8-inch staples works best. It drives them in firm without bending.
Canvas pliers or flat-jaw pliers grip fabric tight. They prevent tears better than hands alone.
Grab a sharp utility knife or scissors. Use them to cut clean edges.
Fine 220-grit sandpaper smooths bar edges. This stops snags.
Optional wood shims or keys tighten the frame later. Drop cloth protects your space.
Wear gloves to avoid splinters. A measuring tape ensures accuracy.
Hunt budget buys at craft stores or online. Total for a medium canvas stays under $30. Stock up now, so you paint sooner.
Prep Your Space and Build a Rock-Solid Frame
Clear a large flat table or floor space. Lay down the drop cloth. Good light helps you spot issues early.
Measure your canvas square with extra overhang. Cut it face down for safety.
Sand all stretcher bar edges smooth. Run the paper along each side. This creates a snag-free base.
Assemble the frame next. Align the mitred corners tight. Insert corner braces or keys if slots exist.
Tap gently with a mallet to lock them. Check for square by measuring diagonals. They must match exactly.
Twist in pre-cut keys for extra hold. Even tension now means no puckers later. Wear gloves always.
Measure and Cut Your Canvas for a Perfect Fit
Lay the canvas face down. Center the frame visually on top.
Mark three to four inches overhang per side. This fabric pulls tight without shortage.
Use a ruler and knife for straight cuts. Straight edges fold neat. Extra matters because skimpy pulls tear easy.
Join the Bars Without Gaps or Wobbles
Match long bars for top and bottom. Shorts go on sides.
Push mitres together firm. Secure with braces. Hammer them lightly in place.
Verify 90-degree corners. Measure diagonals again. Equal lengths mean no twist.
If off, loosen and realign. A square frame holds paint flat forever.
Nail the Stretch: Your Easy Step-by-Step Guide
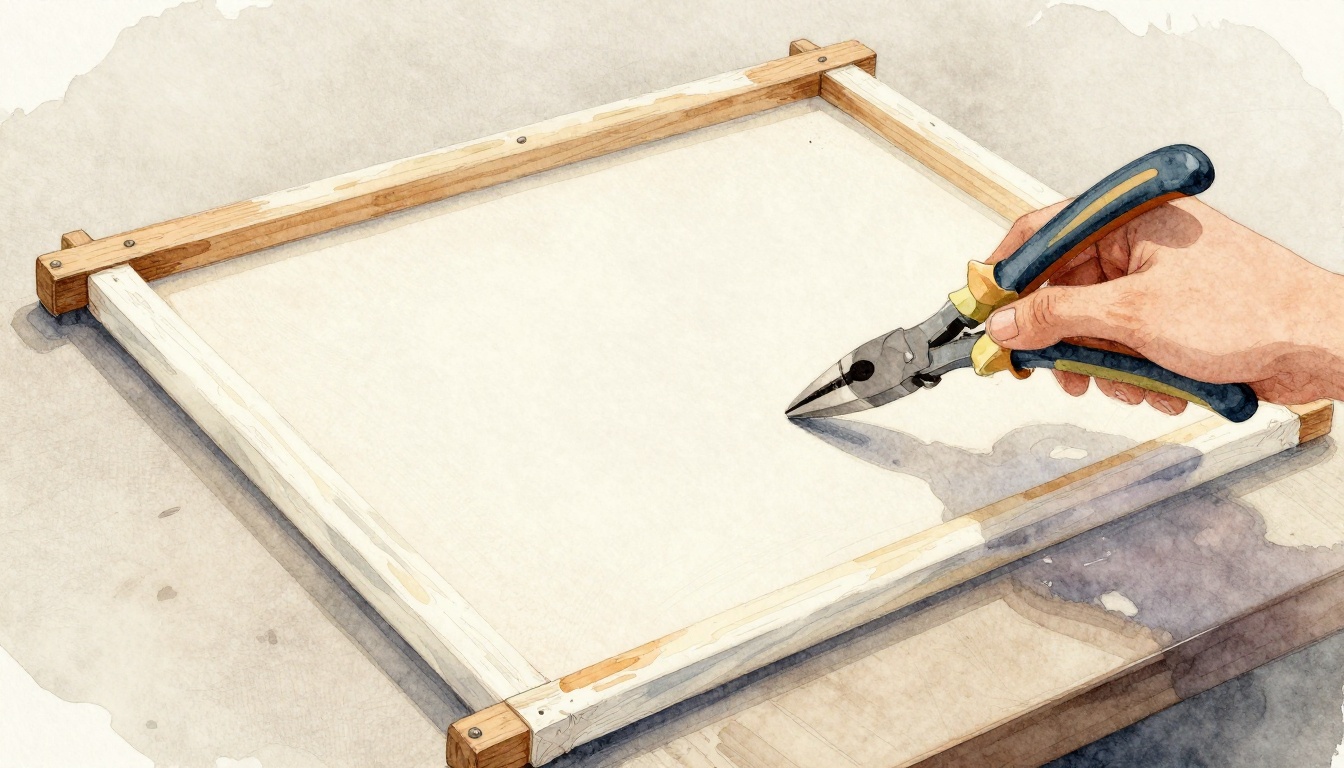
Now stretch the canvas. Go slow for confidence. Pliers pull even for drum-tight results.
Work canvas-side down always. Start one side at a time. Staple, pull, staple opposite. Repeat this mantra.
Rushing causes wrinkles. Patience pays off big.
Center the Canvas and Staple Your First Side
Place the frame in the canvas center. Fold one short edge over the bar.
Pull snug with pliers. Staple the center only first.
Later, space staples one to two inches apart. Trim bulky excess now.
Pull Tight and Staple the Opposite Side
Move to the opposite short side. Yank canvas taut like a trampoline.
Pliers grip best here. Staple center first. Work out to ends.
Alternate sides often. Hammer loose staples flat. Tension builds even.
Tackle the Long Sides Next for Full Tension
Repeat on long sides. Pull hard with pliers from center out.
Staple every one to two inches. Overlap short side staples a bit.
Check for ripples midway. Readjust pulls before finishing. Smooth surface emerges.
Master the Corners for a Clean Pro Look
Fold corners like gift wrap. Pull one flap over tight. Staple secure.
Fold the second flap neat over it. Pliers help grip without slip.
Trim excess close to staples. Not through them. Corners look sharp now.
Double-Check Tension and Make It Drum-Tight
Tap the frame like a drum. It should sound solid.
Push the center. Canvas resists firm. Insert keys in slots if loose. Tap to expand.
Sand rough staple edges. Flip over and admire your work.
Sidestep Common Pitfalls and Add Last Touches
Uneven pulls cause sags. Restaple those spots. Pliers fix most issues quick.
Too-tight staples tear canvas. Grip gentle and steady. Practice on scrap first.
Crooked frames warp art later. Double-check diagonals always.
Prime the raw canvas edges. This seals and protects.
Store flat to avoid bends. Hang with sawtooth or wire.
Frame if needed, but stretched works solo. Your first stretch hooks you for life.
Ready to paint your masterpiece?
Stretching canvas at home saves cash and fits perfect. You gathered supplies, built the frame, and pulled tight with pliers and bars.
This skill opens endless projects. Try it this weekend.
Share your results in comments. You’ve got this, artist!