Picture this: you spend hours painting on raw canvas, only to watch colors soak in unevenly or flake off days later. Frustrating, right? That’s where gesso steps in as your simple fix.
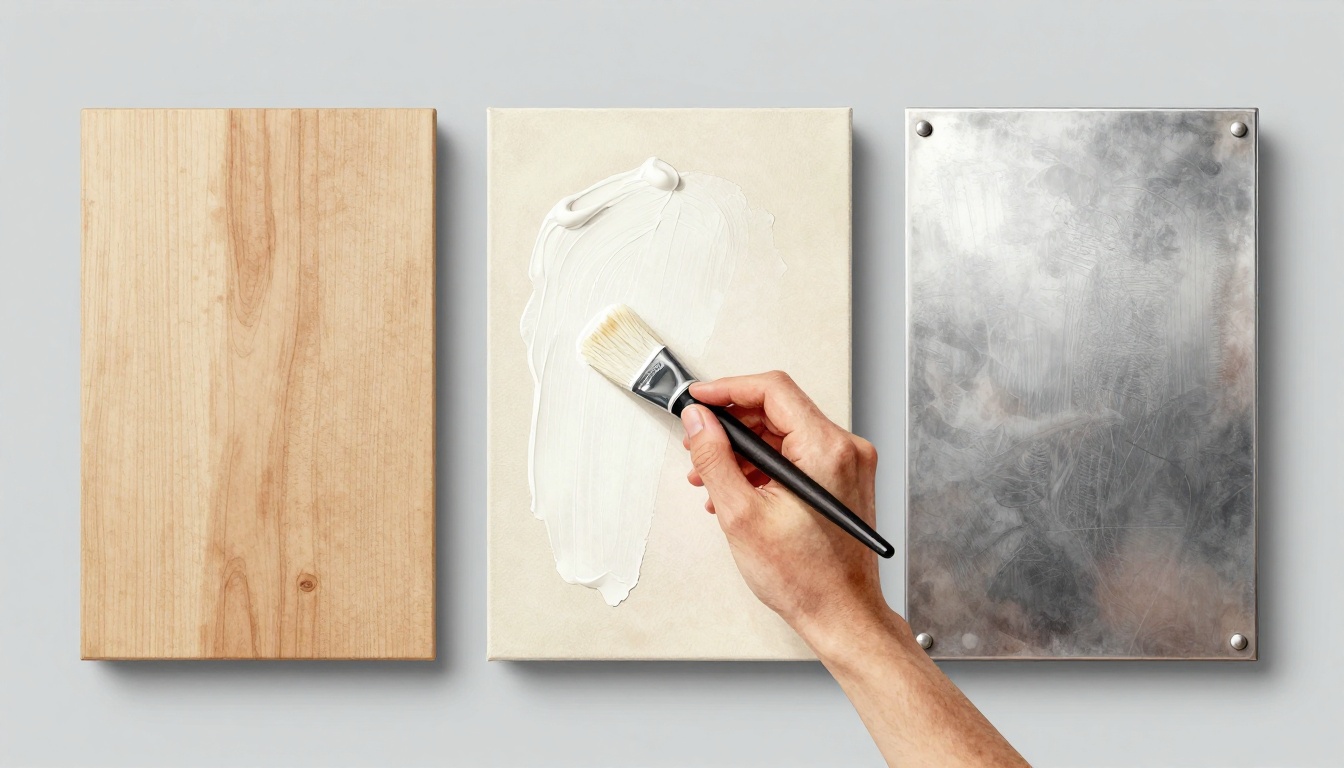
This thick white primer seals surfaces like canvas, wood, or metal, so paint grabs hold strong. It creates even absorbency and delivers smooth, pro-level results without the mess.
You’ll get the basics, supplies list, step-by-step guides for each surface, and pro tips ahead. Let’s prime your next project right.
What Gesso Is and the Big Reasons to Prime Your Surfaces
Gesso acts like the foundation for your artwork. Think of it as prepping a wall before you paint a room. You smooth out bumps and seal the surface so your color sticks evenly and lasts.
This creamy acrylic primer mixes calcium carbonate, binders, and water. It dries to a flexible white layer that grips paint tight. Beginners love it because you apply it easily with a brush, and it handles everyday surfaces without hassle.
Modern Acrylic Gesso vs. Old-School Types
Today’s gesso shines for its simplicity. You get a flexible finish that bends with canvas or wood, so cracks stay away. In contrast, old-school versions used rabbit skin glue mixed with chalk. Those turned brittle over time, especially in changing humidity.
Modern types win for most projects. They clean up with water before drying. Traditional glue needs heat and demands perfect conditions. As a result, beginners skip the fuss and grab acrylic bottles from art stores.
Key Benefits That Make Priming Essential
Priming stops paint from sinking into raw surfaces. Colors stay bright instead of muddying up. It also creates tooth, that slight roughness for better grip. Your brush strokes hold crisp lines.
Wood benefits most from sealing. Gesso blocks moisture, so rot does not set in. Canvas gets even absorbency, and metal resists rust under paint. Therefore, your pieces endure years longer.
You can layer it under oils, acrylics, or watercolors. One coat works for quick sketches; three build a pro base. Most importantly, it saves you from repainting disasters.
A Quick History Lesson on Gesso
Renaissance masters brewed similar mixes from gypsum and glue. They primed panels for oil portraits that still hang in museums. You connect to that tradition today with a modern tube. So, grab your gesso and start strong.
Stock Up Smart: Tools and Materials You Will Need
You need the right gear before priming. These items keep your project clean, safe, and efficient. Start with quality basics, and add budget hacks where possible. In addition, prep your space first for best results.
Set up in a well-ventilated area. Fumes from gesso can linger, so open windows or use a fan. Cover floors and tables with a drop cloth to catch drips. This protects your workspace and saves cleanup time later.
Safety comes next. Wear nitrile gloves because gesso irritates skin. Keep a water jar nearby to rinse tools or hands fast. Wash up right after, even if gloved. As a result, you avoid messes and stay comfortable.
Essential Tools and Why They Work Best
Gather these key supplies for smooth priming. Each serves a purpose, so choose wisely.
- Jar of artist-grade gesso (Liquitex or Utrecht basics): Pick a thick, acrylic formula for strong adhesion. Cheap student grades thin out fast. One quart covers multiple canvases, so it lasts.
- Wide synthetic brushes or foam rollers: Synthetics resist gesso clogs, unlike natural bristles that stiffen. Rollers speed large surfaces; grab dollar store ones for budgets. They spread even coats without streaks.
- Fine sandpaper (220-400 grit): Light grit smooths dried gesso gently. Coarser scratches the surface. Sand between coats for pro texture.
- Plastic palette or plate for mixing: Metals rust; plastic wipes clean. Thin gesso here with water for better flow.
- Lint-free rags and water jar: Rags wipe excess without fuzz. Keep water handy to dilute or clean.
With these, you prime confidently. Budget total stays under $50 for starters. Most importantly, test on scrap first.
Apply Gesso Perfectly to Canvas, Wood, Metal, and Beyond
You stir gesso thoroughly first. Clumps ruin your finish, so mix until smooth. Thin the first coat 10 to 20 percent with water if it feels stiff. This helps it spread easy.
Apply thin, even layers always. Brush in cross directions: vertical first, then horizontal. Dry each coat one to four hours; a fan speeds it up. Sand lightly after every coat except the last. Aim for two to four coats total. Now, let’s break it down by surface.
Smooth Steps for Canvas Priming
Canvas loves gesso because it seals fibers tight. Stretched canvas works best upright. You start with vertical strokes from top to bottom. Then switch to horizontal ones. Press firm with your brush to push out bubbles as you go.
Raw canvas soaks up more, so add an extra coat there. Let it dry fully overnight before paint touches it. Watch corners close; gesso pools there and drips. Wipe excess right away. In short, these steps give you a taut, even base that paint grips without sinking.
Follow this simple sequence for pro results:
- Stir gesso well and thin slightly.
- Load a wide brush and stroke vertical.
- Cross over with horizontal passes.
- Smooth bubbles and check edges.
- Dry, sand light, repeat two to three times.
Your canvas stays flat and ready.
Prepping and Priming Wood for Stability
Wood warps without care, but gesso fixes that. Sand smooth first with 220 grit. This creates tooth for grip. Then coat edges and the back heavy. Extra layers there block moisture and keep boards flat.
Plywood needs flexible gesso most. Regular types crack on flex. Sand well between coats for that ultra-smooth base artists crave. After two coats, your wood handles oils or acrylics like a dream.
Prep like this to avoid issues:
- Sand raw wood even.
- Hit edges and back first.
- Use flex formula on panels.
- Build three coats, sanding each time.
As a result, your artwork lasts years without twists.
Get Metal Ready for Tough Artwork
Metal demands prep because oils repel gesso. Degrease with rubbing alcohol first. Wipe rust spots with steel wool if needed. Thin gesso heavy for the first coat, almost like cream. It etches the surface for bond.
Build slow with two more coats. Sand between for a satin finish that shines under paint. This setup suits outdoor pieces or sculptures. Paint sticks through weather and wear.
Key steps keep it simple:
- Clean and degrease fully.
- Thin first layer thin.
- Layer up, sand light.
- Finish with even sheen.
Metal turns tough canvas for bold work.
Conquer Plastic, Glass, or Ceramics
Smooth stuff like plastic or glass slips easy. Scuff it first with 220 grit sandpaper. This roughs the shine for hold. Mix in modeling paste if grip lacks; a teaspoon per cup does it.
Test a small spot always. Watch for lift off. Multiple thin coats prevent peeling later. Dry times stretch longer on slick spots, so fan them. Your odd surfaces now take paint solid.
Try these for non-porous wins:
- Scuff surface rough.
- Add paste for bite.
- Test patch first.
- Layer thin, four coats max.
Besides, it opens fun mixed media doors.
Dodge Beginner Blunders and Unlock Pro-Level Finishes
You follow the steps, yet cracks appear or bubbles pop up. Beginners face these issues often. However, simple fixes turn mishaps into smooth successes. In addition, pro tricks elevate your work. Let’s spot the traps first and grab those expert edges.
Spot These Top Pitfalls Before They Ruin Your Base
Too many apply gesso in thick globs. It drips down edges and cracks as it dries unevenly. Instead, spread thin layers always. A palette knife scrapes off excess spots fast.
Shaking the jar whips in air bubbles. They leave pockmarks on your surface. Stir gently with a stick instead. This keeps the mix clump-free and bubble-less.
Skip sanding between coats, and you get rough texture. Brush strokes show through your paint later. Light passes with 220 grit fix that quick. Your finish stays satin smooth.
Wrong dilution throws it off too. Too much water makes it runny and weak; too little turns chalky. Test your mix on scrap wood first. Adjust drop by drop until it flows right.
These tweaks save time. You avoid starting over completely.
Pro Tips That Deliver Gallery-Ready Results
Heat dries gesso too fast sometimes. Add a drop of retarder from your acrylic supplies. It slows things down for even curing.
Want dark underpainting? Tint gesso light gray with a touch of black paint. Shadows pop better under colors. This saves layers later.
Store leftovers smart. Seal the jar tight and pop it in the fridge. It stays fresh weeks longer. No waste, more projects.
Practice builds skill fast. Grab cheap wood scraps for test runs. Try thick versus thin coats side by side. Soon, muscle memory kicks in.
Most importantly, patience pays off. Your primed surfaces now hold paint like pros. Next time, you finish confident and clean.
Conclusion
Gesso turns raw surfaces into paint-ready bases with ease. You seal canvas, wood, metal, and more for even colors that last. So, your artwork avoids those early frustrations like sinking paints or flakes.
Most pieces need just 2-3 coats. They dry in hours but cure fully over days. Start small today on scrap wood or canvas. Build that smooth foundation and watch your strokes shine.
Picture your pieces hanging gallery-style. Grab your gesso now. Comment below about your first try, share photos, and subscribe for more guides. What’s your next project?